Peanut Butter Rice Krispie Balls – Easy Treats
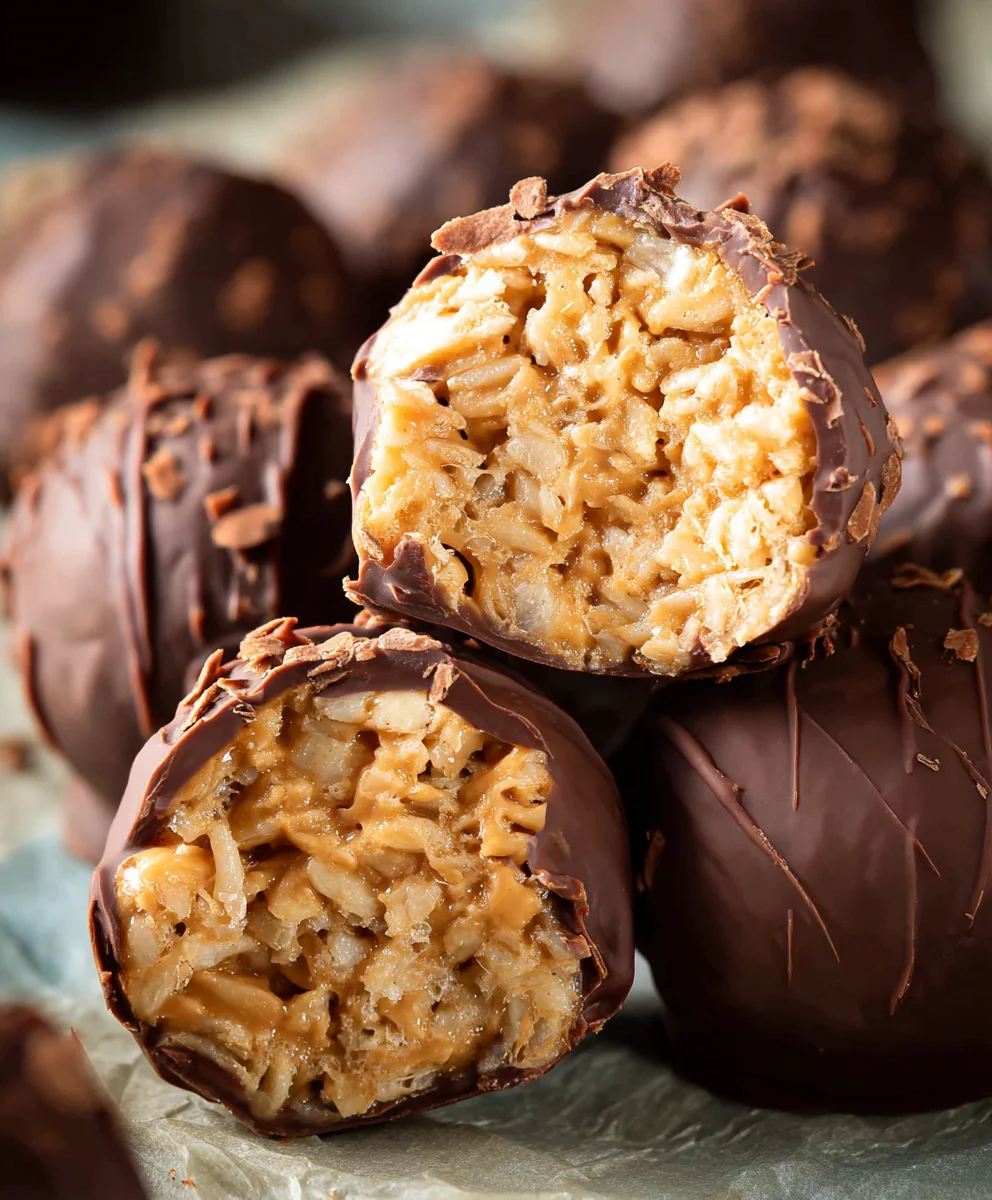
Peanut Butter Balls with Rice Krispies are undeniably one of those nostalgic treats that instantly transport you back to childhood kitchens and happy gatherings. There’s a reason why these simple, no-bake delights have captured so many hearts and taste buds. It’s the perfect harmony of creamy peanut butter, sweet melted chocolate, and the satisfying, airy crunch of Rice Krispies cereal. This magical combination creates a textural marvel that’s both fun to make and utterly addictive to eat. What truly sets these Peanut Butter Balls with Rice Krispies apart is their sheer simplicity and versatility. Whether you’re whipping them up for a quick snack, a party dessert, or a thoughtful homemade gift, they consistently deliver pure joy. Their inherent ease makes them a fantastic activity for kids and a lifesaver for busy adults looking for a delicious, crowd-pleasing option without any fuss.

Ingredients:
- 1 cup creamy no-stir peanut butter
- 3 tablespoons salted butter, melted
- 1 cup powdered sugar
- 2 ½ cups Rice Krispies cereal
- 12 oz semi-sweet chocolate chips (or chocolate melting wafers)
Making the Peanut Butter Base
This is where the magic begin extracts for our Peanut Butter Balls with Rice Krispies. The key to a firm, delicious ball is the right ratio of sticky peanut butter and binding agents. We’ll start by combining our wet ingredients to create a smooth, workable dough. In a medium-sized mixing bowl, add the 1 cup of creamy no-stir peanut butter. The “no-stir” variety is excellent here because it’s already smooth and won’t have those oily pockets that can make your mixture less cohesive. Next, pour in the 3 tablespoons of salted butter, which you’ve already melted. Melting the butter helps it incorporate more evenly and binds the peanut butter mixture beautifully.
Now, it’s time to introduce the sweetness and further bind our base. Gradually add the 1 cup of powdered sugar to the peanut butter and butter mixture. It’s best to add the powdered sugar in stages, mixing well after each addition. This prevents the sugar from flying everywhere and ensures it gets fully incorporated. You can use a sturdy spoon or a rubber spatula for this. The mixture will start to thicken and become quite stiff, resembling a cookie dough. Continue mixing until there are no visible streaks of peanut butter or butter and the sugar is fully integrated. This step is crucial for achieving that perfect texture; you want a dough that’s firm enough to roll into balls but still pliable.
Incorporating the Crispy Crunch
With our peanut butter base ready, it’s time to add the signature crunch of our Peanut Butter Balls with Rice Krispies. Gently fold in the 2 ½ cups of Rice Krispies cereal. It’s important not to overmix at this stage, as we want to keep as many of those little rice bubbles intact as possible to maintain their crispiness. Use your spoon or spatula to carefully coat the cereal with the peanut butter mixture. You’re aiming for a texture where the cereal is evenly distributed throughout the peanut butter dough, but not crushed or broken down. The peanut butter mixture acts as the glue that holds the cereal together, so ensure every grain gets a good coating. This step is where the delightful texture of these no-bake treats truly comes to life.
Forming the Balls
Now for the fun part – shaping our delicious creations! gin extractll begin rolling the mixture into bite-sized balls. The mixture can be a little sticky, so here’s a helpful tip: lightly grease your hands with a little cooking spray or a tiny bit of butter. This will make it much easier to handle the dough without it sticking to your fingers. Scoop about a tablespoon of the mixture at a time and roll it between your palms to form a compact ball, roughly 1 to 1.5 inches in diameter. Don’t worry if they aren’t perfectly round; a slightly rustic look adds to their homemade charm! As you roll each ball, place it on a baking sheet lined with parchment paper or wax paper. This prevents them from sticking to the sheet and makes for easy transfer later. Continue this process until all the peanut butter and Rice Krispies mixture has been formed into balls.
Chilling for Stability
Before we move on to the chocolate coating, it’s essential to let our formed Peanut Butter Balls with Rice Krispies chill. This step is critical for ensuring they hold their shape when dipped in melted chocolate. Place the baking sheet with the formed balls into the refrigerator for at least 30 minutes. This allows the peanut butter mixture to firm up considerably. If you’re short on time, you can pop them in the freezer for about 15-20 minutes, but be careful not to freeze them solid, as this can make them difficult to coat. The chilling process makes the balls firm enough so they won’t crum extractble or fall apart when you dip them into the warm, melted chocolate.
Melting and Coating with Chocolate
The final touch for our Peanut Butter Balls with Rice Krispies is a decadent chocolate coating. You have two excellent options here: semi-sweet chocolate chips or chocolate melting wafers. Both will yield a delicious result. For melting, you can use a double boiler or the microwave. If using a double boiler, place the 12 oz of semi-sweet chocolate chips (or melting wafers) in the top bowl set over simmering water, stirring occasionally until smooth and melted. If microwaving, place the chocolate in a microwave-safe bowl and heat in 30-second intervals, stirring after each interval until completely melted and smooth. Be patient and avoid overheating, as chocolate can scorch easily. Once the chocolate is beautifully smooth and pourable, it’s time to dip our chilled peanut butter balls.
Taking one chilled peanut butter ball at a time, carefully drop it into the melted chocolate. Use a fork or a dipping tool to gently coat the entire ball, ensuring there are no bare spots. Lift the coated ball out of the chocolate, allowing any excess to drip back into the bowl. Gently tap the fork against the side of the bowl to help remove any large drips. Carefully place the chocolate-coated ball back onto the parchment-lined baking sheet. You can also use a toothpick inserted into the ball for easier dipping and then carefully remove the toothpick, smoothing the small hole with a little extra chocolate. If you want to add some flair, you can drizzle extra melted chocolate over the top of the balls once they are set, or sprinkle them with a few extra Rice Krispies, chopped nuts, or colorful sprinkles while the chocolate is still wet. Let the chocolate set completely at room temperature or speed up the process by placing them back in the refrigerator for about 10-15 minutes. Once the chocolate is firm, your Peanut Butter Balls with Rice Krispies are ready to be enjoyed!
Conclusion:
And there you have it – a delightful journey into the world of no-bake treats with these irresistible Peanut Butter Balls with Rice Krispies! We’ve explored how simple ingredients can transform into a crowd-pleasing confection that’s perfect for any occasion. These little spheres of joy are incredibly versatile, making them a fantastic addition to lunchboxes, dessert platters, or simply a satisfying snack when that sweet craving hits. Don’t be afraid to experiment and make these Peanut Butter Balls with Rice Krispies your own!
For an extra touch, consider drizzling them with melted chocolate or rolling them in sprinkles before they set. If you’re feeling adventurous, try adding a pinch of cinnamon or a tablespoon of mini chocolate chips to the mixture. The possibilities are truly endless. We encourage you to get in the kitchen, have fun with this recipe, and share the delicious results with your loved ones. Happy baking (or rather, no-baking)!
Frequently Asked Questions:
Can I make Peanut Butter Balls with Rice Krispies ahead of time?
Absolutely! These Peanut Butter Balls with Rice Krispies are perfect for making in advance. Store them in an airtight container in the refrigerator for up to a week. They tend to firm up even more when chilled, making them a great make-ahead treat for parties or busy weeks.
What other kinds of cereal can I use in place of Rice Krispies?
While Rice Krispies provide that signature crunch, you can certainly experiment with other cereals. Crispy rice cereals with different flavorings, puffed rice, or even finely crushed corn flakes can be used. Just be mindful of the texture and sweetness of the cereal you choose, as it might alter the final taste and consistency of your Peanut Butter Balls with Rice Krispies.
Peanut Butter Rice Krispie Balls – Easy Treats
Easy no-bake treats combining creamy peanut butter, crispy Rice Krispies, and a decadent chocolate coating.
Ingredients
-
1 cup creamy no-stir peanut butter
-
3 tablespoons salted butter, melted
-
1 cup powdered sugar
-
2 ½ cups Rice Krispies cereal
-
12 oz semi-sweet chocolate chips
Instructions
-
Step 1
Combine creamy no-stir peanut butter and melted salted butter in a medium mixing bowl. -
Step 2
Gradually add powdered sugar, mixing until a stiff, cookie dough-like mixture forms. -
Step 3
Gently fold in Rice Krispies cereal until evenly coated. -
Step 4
Roll the mixture into bite-sized balls (about 1-1.5 inches in diameter) and place on a parchment-lined baking sheet. Lightly grease hands if sticky. -
Step 5
Chill the balls in the refrigerator for at least 30 minutes to firm up. -
Step 6
Melt semi-sweet chocolate chips using a double boiler or microwave. -
Step 7
Dip each chilled ball into the melted chocolate, coating thoroughly. Let excess chocolate drip off and place back on the parchment-lined baking sheet. -
Step 8
Allow the chocolate to set completely at room temperature or in the refrigerator.
Important Information
Nutrition Facts (Per Serving)
It is important to consider this information as approximate and not to use it as definitive health advice.
Allergy Information
Please check ingredients for potential allergens and consult a health professional if in doubt.